Want to add stylish, animated buttons to the top of your WordPress site — without touching your theme files?
In this post, I’ll show you how to add responsive buttons with icons using a simple HTML + CSS snippet with the WPCode plugin.
✅ Features of This Button Set:
- Fully responsive (mobile-friendly)
- Animated hover effects
- Includes icons (Windows, Android, Movies, Live TV)
- Easy to insert using the WPCode plugin
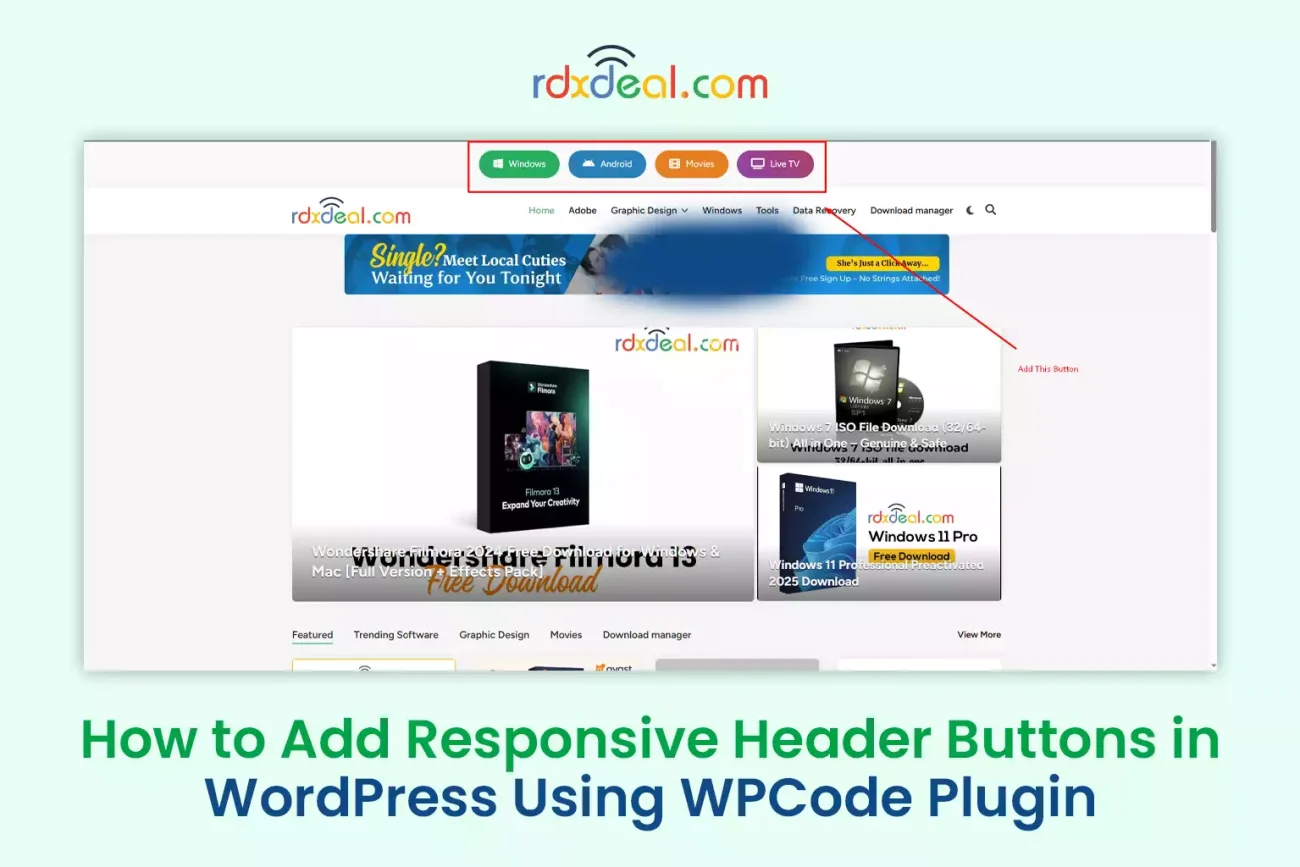
📦 What You’ll Get
Here’s a preview of the button row:
- 🪟 Windows
- 🤖 Android
- 🎬 Movies
- 📺 Live TV
All buttons come with a smooth animation and responsive layout.
🔧 How to Add This to Your Site (No Coding Needed)
Step 1: Install the WPCode Plugin
Go to your WordPress dashboard and install the Insert Headers and Footers by WPCode plugin.
Step 2: Create a New Snippet
- Go to WPCode → Code Snippets → Add New
- Choose “Add Your Custom Code”
- Select HTML Snippet
Step 3: Paste the Code Below
<!-- Start: Responsive Header Buttons -->
<link rel="stylesheet" href="https://cdnjs.cloudflare.com/ajax/libs/font-awesome/6.5.0/css/all.min.css">
<style>
  .wpcode-header-buttons {
    display: flex;
    justify-content: center;
    align-items: center;
    flex-wrap: wrap;
    gap: 15px;
    padding: 15px;
    background: #f9f9f9;
    z-index: 9999;
  }

  .wpcode-header-buttons a {
    padding: 12px 24px;
    font-size: 15px;
    border: none;
    border-radius: 50px;
    color: #fff;
    text-decoration: none;
    display: inline-flex;
    align-items: center;
    gap: 10px;
    transition: all 0.3s ease-in-out;
    white-space: nowrap;
  }

  .wpcode-header-buttons a i {
    font-size: 18px;
  }

  .btn1 { background: #27ae60; }
  .btn1:hover { transform: translateX(5px); box-shadow: 0 4px 15px rgba(0,0,0,0.2); }

  .btn2 { background: #2980b9; }
  .btn2:hover { box-shadow: 0 0 20px #3498db, 0 0 30px #3498db; }

  .btn3 { background: #e67e22; }
  .btn3:hover { animation: bounce 0.5s; }

  @keyframes bounce {
    0% { transform: translateY(0); }
    50% { transform: translateY(-8px); }
    100% { transform: translateY(0); }
  }

  .btn4 {
    background: linear-gradient(45deg, #8e44ad, #c0392b);
    background-size: 200% auto;
  }
  .btn4:hover {
    background-position: right center;
    box-shadow: 0 4px 15px rgba(0,0,0,0.2);
  }

  @media (max-width: 768px) {
    .wpcode-header-buttons {
      flex-direction: column;
      align-items: stretch;
      padding: 10px 20px;
    }

    .wpcode-header-buttons a {
      justify-content: center;
      width: 100%;
      text-align: center;
    }
  }
</style>

<div class="wpcode-header-buttons">
  <a href="https://rdxdeal.com/category/software/" class="btn1">
    <i class="fab fa-windows"></i> Windows
  </a>
  <a href="https://rdxdeal.com/category/android-software/" class="btn2">
    <i class="fab fa-android"></i> Android
  </a>
  <a href="https://rdxdeal.com/category/movies/" class="btn3">
    <i class="fas fa-film"></i> Movies
  </a>
  <a href="https://rdxdeal.com/category/live-tv/" class="btn4">
    <i class="fas fa-tv"></i> Live TV
  </a>
</div>
<!-- End: Responsive Header Buttons -->
Step 4: Display Site-Wide
In the snippet settings, choose:
- Location: Site Wide Header
- Device: All
- Click Save & Activate
✅ That’s It!
You now have a clean, animated, responsive button group showing on every page of your WordPress site.
Want a sticky version or footer version? Let me know in the comments!
wordpress, wpcode, responsive buttons, animated menu, add header buttons, wordpress customization, font awesome, how to, wordpress tips